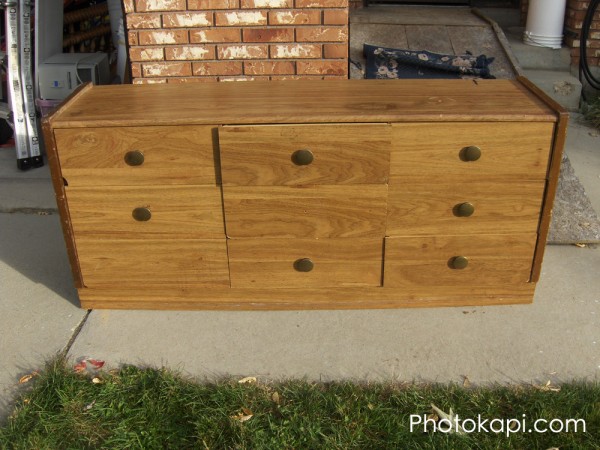
I got this old dresser from my in-laws. It was old when they bequeathed it to us, and we used it for 4 more years after that.
The drawers were beginning to get stuck and not slide easily, and several were chipped on the edges so I decided to change up the layout to something more useful (and since we got a dresser that fit their new room better.)
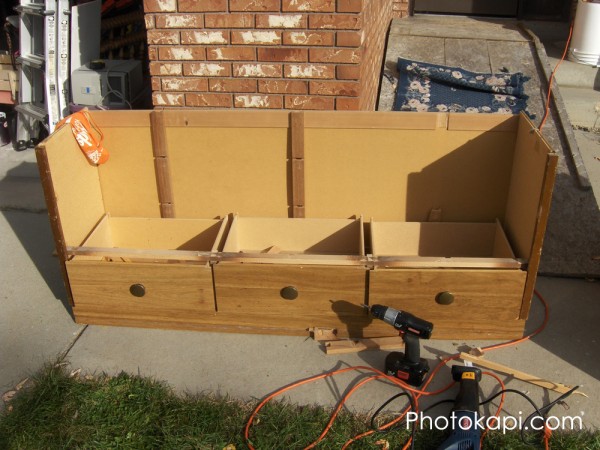
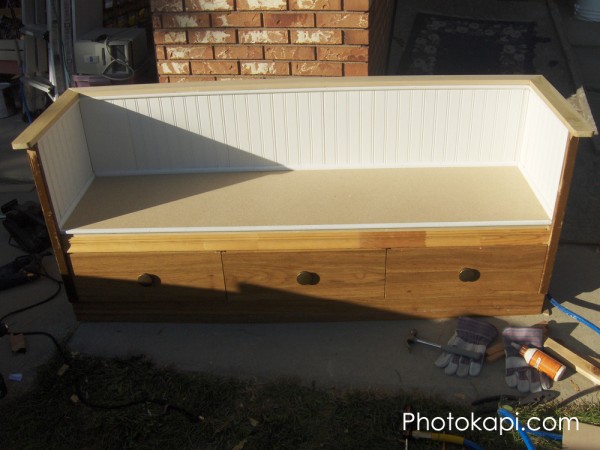
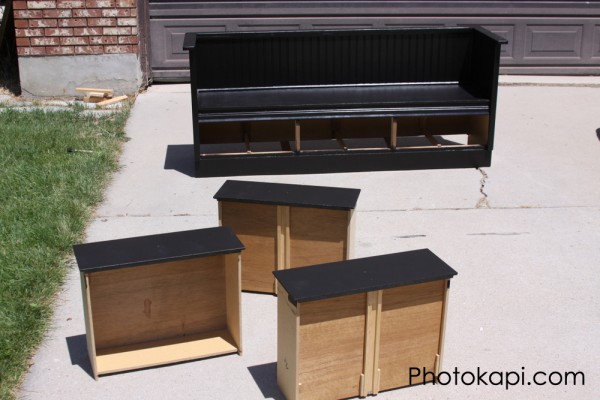
First I took off the top and first two rows of drawers using a drill and reciprocating saw.
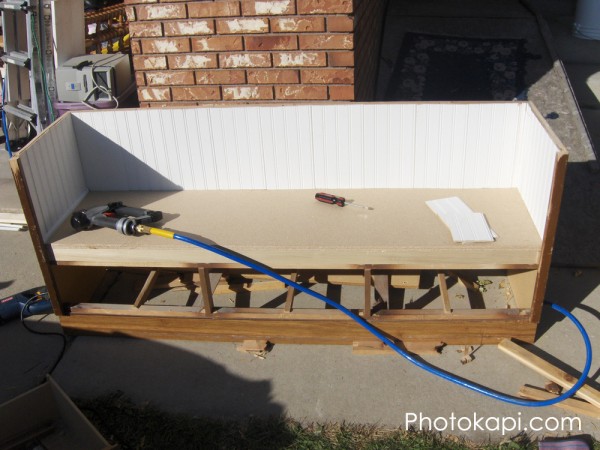
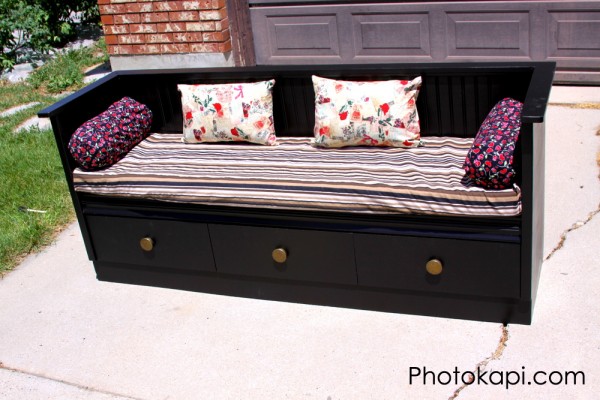
After cutting off the two remaining uprights on the left hand side, I nailed on a piece of 3/4 inch fiberboard across a frame on top of the old drawer rail. I put 1×4’s all the way around on edge, with one across the center for support. Then I added in wainscoting around the back.
I added a top rail of 1 x 3’s and sanded over the edges
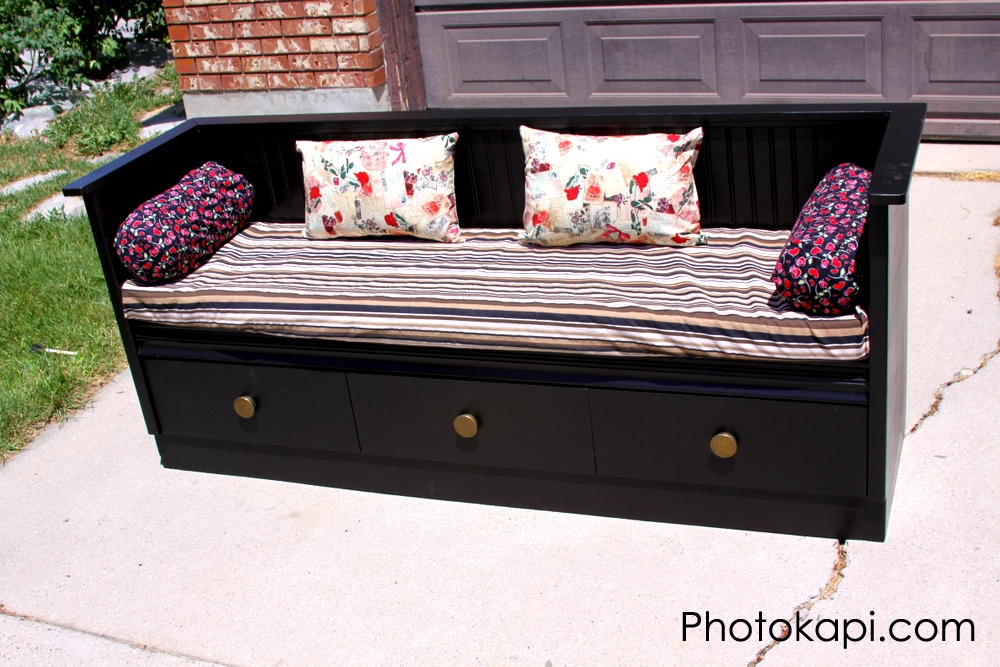
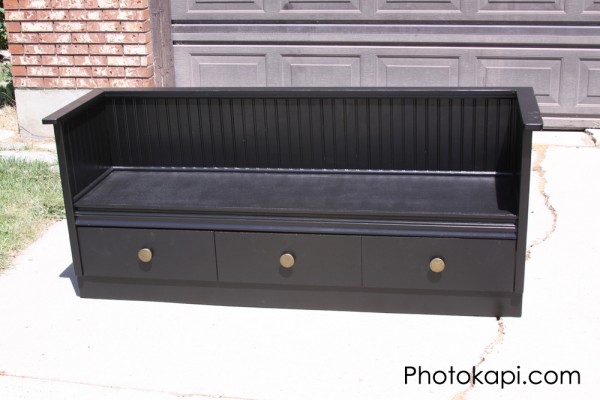
I then painted it gloss black (which was to as fun as one might imagine on a 100 degree+ day, but at least the paint dried quickly)
After I finished and let it dry for a couple of hours in the sun.
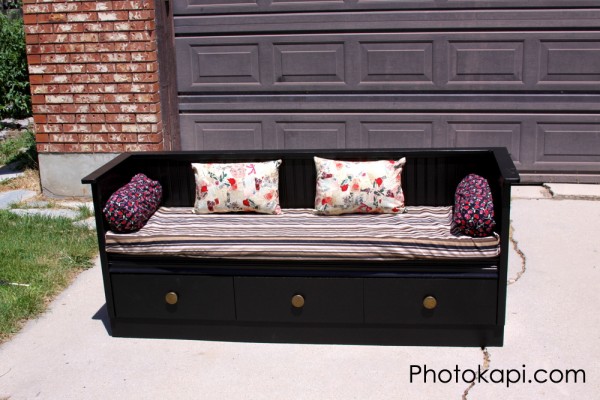
My wife made a foam pad and pillow covers for the top, and the drawers are used for storage of seasonal covers for the pillows and things that need to be given back to people (lost shoes, serving dishes etc from visitors)
It now sits our front entryway (which I can’t take a decent picture of since it is so narrow — which was the reason for the bench anyway.)
Total cost — $10 since I had the pain paint, and most of the wood on hand, probably about $25 if I had needed to purchase all of the materials.


July 12, 2012 at 3:59 pm
That old dresser must feel so happy to be looking good again. 🙂
July 12, 2012 at 7:51 pm
Since it cost you $10, can I buy it for $15?? 😉 Just kidding, I would totally spend $50 on it if I were the spending type. 🙂 It’s awesome!!
July 12, 2012 at 11:15 pm
“Total cost — $10 since I had the pain, and most” – too funny since I was thinking of how much pain it would have caused me do something like this! Very very nice job, it looks fantastic!
July 12, 2012 at 11:55 pm
Yeah — edit PAINT 😛
June 22, 2013 at 5:52 pm
Thats gorgeous! How did you get the idea for that?
June 25, 2013 at 10:19 am
I got the idea as I was sitting on the dresser in my daughter’s room one day. The top started to bow a little and I thought, I should reinforce this, then as I looked into it more, decided to up-cycle it instead.
February 4, 2014 at 12:01 pm
Fantastic we all love it
June 5, 2014 at 9:28 pm
What kind of paint did you use?
I painted an oak box white but I can see the natural oak coming through
June 6, 2014 at 4:21 pm
Black oil-based paint with primer as part of it.
October 13, 2014 at 2:49 am
The bench looks fantastic, Geoffrey! Great work!
February 7, 2015 at 7:36 am
Awesome idea! I’m interested in making but need to know how I can make it last when placing outside …is there some paint or something that would work? Planning on putting it in flower garden but it will be exposed to the elements there
March 5, 2015 at 3:41 pm
Oil based paints will last the best, but you are still probably going to have issues with weathering.
March 15, 2015 at 6:14 pm
I’m sorry if this is already written but I’m not sure. I’m in the middle of making one but I don’t know what you did on the portion that you sit on? how thick is the piece of wood? I would imagin it would have to be reinforced to be able to hold an adults weight.
March 16, 2015 at 2:25 pm
It is 3/4 inch particle board, and I have a couple cross supports along the length.
March 25, 2015 at 11:32 am
This love this project with the old dresser and told my husband I wanted him to make me one, but he said he doesn’t understand where to put 1×4’s all the way around on edge, with one across the center for support. So could you please help me by letting me where the ix4’s go. We couldn’t tell by looking at the picture.
Thank You very much
Bev
June 12, 2015 at 9:01 am
The 1x4s would be what he put along each side and the back – and from side to side across the middle – to support the “seat” area.
March 26, 2015 at 8:52 am
Love the bench. Going to do the yard sale thing this weekend and will look for an old dresser for this project. thanks for sharing your creativity and photography gift.
March 31, 2015 at 9:27 pm
I agree it is a bit confusing as to what you did with the seat for support to avoid it collapsing
April 2, 2015 at 1:29 pm
This looks awesome! Great job!
April 7, 2015 at 10:22 am
terrific idea! Definitely trying this with an old, unused dresser.
June 5, 2015 at 11:09 am
This is an awesome project. I have been wanting a bench for sitting and storage in my bedroom, but they are all so EXPENSIVE – usually over $100 for the very cheapest I’ve found. Thanks for this!
June 5, 2015 at 11:32 am
Why didn’t you re-purpose the original top as the seat base?
June 8, 2015 at 9:02 am
The original top had some water damage as well as a hole in it that had been used to run a TV cord out of the way through the dresser.
June 5, 2015 at 3:26 pm
Would you please post the materials and tools to do this project. I have a dresser.
BTW, great job on bicycle.
Thanks for sharing.
June 5, 2015 at 9:55 pm
U r awesome I hope I can pull this off bravo
June 6, 2015 at 1:11 pm
totally LOVE this!!
this would be good for a family room, sun porch or a covered and protected porch or deck.
i’ve seen some longer dressers that would have made a good youth or day bed too. 🙂
June 6, 2015 at 1:32 pm
Other great ideas ? Up cycle. .. only way to have exactly what you want / need with a little $$ and am a great imagination !
June 6, 2015 at 7:10 pm
Yes I’m confused on the “frame” u built for the seating area could u draw a pic for that ??
June 8, 2015 at 9:04 am
The frame was just a “lip” around the whole inside edge of the dresser to lay and fasten the particle board.
June 7, 2015 at 7:37 am
That is beautiful.
I have an old dresser just like that.
Gonna be a great rainy day job.
Thanks for sharing it.
June 7, 2015 at 8:10 pm
So, was the dresser top not suitable to be cut down to use as the seat? I’m pretty hard on fiberboard.
June 7, 2015 at 11:11 pm
Could the original top have been cut down and used for the seat?
June 8, 2015 at 5:53 am
I hope this site is still being used. Geoffrey, you mentioned that you used cross boards for support. what kind of boards, size and where did you place them exactly (I know beneath the particle board, but I mean where did you place them so that they best supported the particle board)? thanks for responding if you see this !\
June 8, 2015 at 9:06 am
I placed 1×3’s underneath along the edge. I believe I put one on each side, one down the middle, then one on each side of that in the middle, for a total of 5 supports.
June 8, 2015 at 9:38 am
thank you ! that was very helpful 🙂
June 8, 2015 at 8:22 pm
Along the same as you did with the old dress I left the two rolls of drawers (my grand-daughter was having baby and was in need of storage and short on room) and made storage for baby and a changing table along same lines she love it. Now I’m really favorite grandma.
June 9, 2015 at 9:03 pm
That is awesome!!!
June 10, 2015 at 1:07 pm
to to too….
AND I love this idea… would be great for a tiny house for extra sleeping area for tiny guests. 🙂
Looking on CraigsList now for a wooden victim 🙂
June 10, 2015 at 10:17 pm
This is awesome.
June 11, 2015 at 11:18 am
Wow, how creative!
July 9, 2015 at 8:19 am
That is so cool I want one
September 16, 2015 at 4:48 am
Hi
I totally love this project and will definitely consider it in the future however currently i have no time on my hands!
I am from the UK so some of the items you used i have no idea where i can get them.
Could you maybe post a picture of all the items used?
Many Thanks
January 19, 2016 at 9:48 am
What kind of wood was this dresser?
January 19, 2016 at 9:57 am
It is mostly fiberboard with some pine boards as well, but most of what I added was pine.
March 23, 2016 at 6:42 am
That is neat, someone put a lot of thought into it.
March 28, 2016 at 8:51 pm
That is so sweet i think ill try it.
April 8, 2016 at 8:05 am
I love this. I was going to sell my old pine TV corner unit which is in need of some TLC. I think I’ve changed my mind and will use your idea to make a corner bench for my spare room. Thanks
January 22, 2017 at 7:25 am
Hello… can you tell me what tool you used to take the top off or did you just pry it off?
January 26, 2017 at 2:02 pm
I just used a pry-bar.
September 6, 2017 at 3:00 pm
I so love this idea! I’m going to try to do this with an old dresser that’s in my daughter’s room that I planned on throwing away. Plus it’ll be a great Mother / Daughter Project. She can also pick the color of paint & we can stencil anything she wants on it, unlike the ones in store’s that tend to either be to kiddish or to plain! Thanks for the Wonderful Idea to Reuse Rather than Trash it! Wish us luck! Lol. I’ll share a picture of ours when we’re done if your OK with that?
September 6, 2017 at 3:27 pm
Of course!